Pages

WISE IRISH BLOG

Stories of Friendship, Family, Fun and Food.
All the way from the Emerald Isle!

Monday, November 22, 2010

Butternut Squash Soup


Right now at this very moment, you should be eating squash. Butternut, Acorn, Pumpkins. All of them are on display at the local markets and grocery shops, and they cost next to nothing. So, if that is not reason enough to go out and buy them, then consider the health benefits!

When we lived and worked in the US, we loved this time of year because our very good friend Farmer Jon kept us in constant supply of Pumpkins and Winter Squash. I have noticed that although people are not really eating them, there are a heck of a lot more pumpkins around this year, as opposed to the last two years. So, if you are wondering what to do with some of them, then why not try an easy soup recipe. 


We use the smaller orange ones (like in the photo above) or the butternut squash (below). The flesh is firm and they are both very sweet.  Cut them in half (you need a very strong arm and sharp knife for this task) and scoop out the seeds and stringy bits. Dispose of this in your compost bin.


For the soup you will need:

2 large squash
1 tbsp salt
1 tsp white pepper
1 tbsp butter
3 cups of chicken stock
4 tbsp honey
1tsp ginger (fresh grated)
4 oz heavy cream
1 tsp nutmeg

How to make it:

It is best if you roast the squash first. Flesh side up, rub the squash with the butter, and sprinkle with salt and pepper. Allow to roast in a fairly hot oven for 40 minutes. Once done, the squash can be scooped out of its skin into a large pot. It will taste delicious with a much more concentrated flavour from the roasting process.

Next add the chicken stock, honey and the ginger and with your stick blender, puree the soup.
Allow it to simmer, then stir in the heavy cream. Taste it, trying not to burn your mouth.
Season with salt, pepper and nutmeg. 

A little dollop of cream on top for presentation purposes finishes it off nicely.

Enjoy!


We have just heard the word 'Snow' thrown into weekend forecast. Seeing as my winter jacket is still in the attic and has not been used once since moving home from the US, I will not hold my breath!

Just a little over a month until Christmas, time to get those lights up!

Those are all the WiseWords I have for today,

WiseMóna

Friday, November 19, 2010

It is the circle of life.


Your beautiful Irish Red coat on fire
with huger in your belly.


You woke me from my sleep
as you slinked into my garden this morning.

I knew you were coming.
We have unfinished business.

Feeding your family or they die,
I get it. 

But these ducks are my family.

Your hunger will have to be fed elsewhere,
beautiful, brown eyed Fox.


WiseMóna

Happy Weekend Everyone!

I really wanted to go into a long and lengthy rant describing how the fox broke into our compound last Sunday. He killed two of our birds and left one for almost dead. A laying Hen and a laying Duck - why couldn't he have taken one of the roosters? We have a few extra of those. Now my egg supply is almost non existent.

It was gruesome, and one of our beautiful ducks is in the back kitchen still recovering. She might not make it. I know this is the circle of life, I get it. I know that the fox is just trying to feed her young.

But let's face it, so am I. I mean, isn't that what 'Farm to Fork' is all about?

I have not had a good nights sleep since Sunday, wondering if I would have to face the slaughter again. 

At 5:55am when I heard a quacking outside, I jumped out of bed and raced outside. As soon as I lit up the back garden like a football field, the brazen fox leapt out of the animal compound and stood at the corner of the fence. He stared at me for a breathless eternity. Then he turned and walked away, looking over his shoulder back at me as if to say 'I'll get them, my pretty' ...

For those of you that know us, here is a little breakfast humour. Pearl was hot on the scent. She immediately started to bark and nose down like a bloodhound she started tracing the scent of the fox. She was so nosed-down in the grass she was completely oblivious to the fact that the fox was literally one foot away from her. In a way I am glad she never looked up!

I have never been that close to a fox before, and even though I hate that he is trying to feed of my flock, I could not help but marvel at how beautiful he was. I should have chased him with a big stick or a BB gun. 

This is the downside to being a big softie when it comes to animal husbandry. I need to toughen up and not get so attached. 

aaaaggghhhh............

Monday, November 15, 2010

Is it really too early to start the festivities?

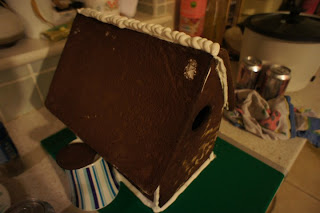
I am pretty sure it is too soon. I know that Thanksgiving has not even happened across the pond in America, and here I am pushing Gingerbread House ideas in to your kitchens in the hopes that a few of you will give it a whirl. I know this looks intimidating, but trust me, it is relatively easy to bake and make.  

So, to get started, draw a template. We have used different ones over the years an if you just do a bit of digging around on the internet, you will find a gazillion different templates. If this is your first time, then keep it simple and make sure you are very accurate in your measuring.


Next - Make your Gingerbread on a Friday evening, and leave it to chill overnight.
Here is our recipe, and it really does taste YUMMY. It dries rock hard like gingernut/snap cookies and the kids fought over it last year, right down to the last crumb.

Gingerbread House

6 cups of cream/all-purpose flour
1 tsp baking soda
½ tsp baking powder
4 tsp ground ginger
4 tsp ground cinnamon
1 ½ tsp ground cloves
1 tsp finely ground black pepper
1 cup dark brown (moist) sugar
1 ½ tsp salt
1 ½ cups of treacle (or molasses)
2 large eggs
1 cup unsalted butter


Directions
Sieve together the flour, baking soda and baking powder.
In a separate bowl, cream the butter and brown sugar until fluffy. 
Mix in spices and salt, then beat in eggs and   treacle. Use an electric mixer.
Add your flour mixture and mix on low speed until it is mixed in well. 
Divide the mix into three parts. Wrap in cling film and chill for at least one hour. 
This is imperative. The gluten needs to rest before rolling it out and it is easier to work with a 
‘cold’ dough as it holds its shape better. We chilled ours overnight.
Heat your oven to 240 degrees celsius. 
Roll out the dough (on a floured surface) to 1/8 inch thick.
Cut into desired shape. Place your dough shapes on un-greased baking sheets.
Chill gain until firm. (At least 15 mins)
Bake until Gingerbread is firm in the center but NOT dark around the edges. (15 - 20 mins). 

(Sometimes, when one should be 'watching' the Gingerbread, one might get distracted 
and even  forget that this is in the oven. It is possible that the GIngerbread might even burn. 
Fear not, if this happens. Once it is fully baked, you can take it out of the oven and scrape it off
before any husbands might see it, or smell it.  Amazingly, it still tastes good! Or, so I have heard)

Whilst you are waiting for this to bake, start sorting thorough your candy stash and figure out 
what you need to get for your decorating the next day. 
Remember, candy canes, and red and green M&M’s are a must, but if you are creative, and I know you all are,
you do what we do and use up all that left over halloween candy!


Now to stick it all together. OK, before I give you this recipe, I know you can buy royal icing in a bag and 'just add water', so if you want to do that, go ahead. I just want you to know, that if you make your own you will have a lot more fun because it has an amazing taste and texture, and it is great to work with. There is going to be some finger licking going on. Also, if you do not get finished (like ours is not done yet!) then the icing/glue will stay in the fridge for a few days. Great stuff and you can dye it different colours too!

The Glue
3 egg whites
1lb powdered/icing sugar
A pinch of cream of tartar
5 drops lemon juice

Mix together and spoon into a piping bag with interchangeable pipping nozzles.


Ok. So, you are baked (well your gingerbread is, right?) and ready to go. Now, find some canned tomatoes or FULL coke/beer cans to use as props. Remember, as you start to assemble the four walls of your house, that once glued, you will not be able to move your house. SO, put it on a tray or cutting board that you will NOT NEED on Christmas Day to carve the Turkey. Otherwise, you might be getting a new cutting board in your Christmas stocking for forgetting that important fact. 


You really need the emotional and physical support of a partner or friend for this part. Although you may end up doing nothing except 'stand there and look pretty' you are on hand incase the walls fall down around you. If you have taken care to measure your template carefully and then have cut out your dough according to the measurements, and you have baked everything on a nice FLAT baking sheet pan (not a wonky old warped one), then all will fit together like it is supposed to. If it is warped, you can wrap it in a warm damp tea towel, let it soften a little and wait till tomorrow to try again after it has dried and hardened.


Glue the interior wall joints and the exterior wall joints. Also run a nice thick line of the icing/glue around the exterior and interior base lines. 


It is best if you wait for several hours before you try to 'roof it'. We use a nice large roof, for the desired effect, and needed to prop it up on both sides with large coffee mugs to hold it in place for a few hours. The icing/glue mix is great though and we were able to start decorating much faster than expected. If you are planning on doing this project with your kids, it really is best to try to do these few steps when they are in bed. Less stress for everyone.


Now, let the fun begin. Of course, you need some REDs and GREENS. So, the large Christmas Peanut M & M's are in the shops right now - go get some! Everything else we used was just leftover halloween sweets. We cut up a lot of stuff to get the look we were after, and we still have some work to go on it, because I have to get some RED licorice and a few other sweeties to finish it off.


Once you start decorating, it could take as little as a few hours to get it finished and ready for display, or it might take a little longer if you let adult friends that have never had the experience the kids dive in.


Either way, this is a very very inexpensive activity for the whole family to do together. Not to mention it will also be an awesome conversation piece for all your friends and family to see when they stop by to bring you tidings of good joy over the Holiday Season. Next weekend we are making Gingerbread people to use as decorations on the Christmas Tree - stay tuned. 

It is just FORTY days till Christmas. The whole year has slipped by us in the blink of an eye. I think I have been fighting the Christmas Spirit for way too long now, mostly due to the fact, eleven years ago, that my Dad was buried Christmas Eve. I finally feel like that weight has lifted, and I think this is mostly due to the fact that our house is filled with screaming-kid-chaos and I no longer have time to dwell on my own misery, but have to put their happiness first.

There is a very cool Continental Christmas Market coming to Galway (starting this weekend!) for the next month and I hope lots of you will come to do your Christmas shopping here and stop in for some egg nog and tasty treats at our place when you are done! 

Those are all the WiseWords I have for today as I have successfully managed to avoid at all costs another evening of homework and study for my pending exams!

WiseMóna


PS - if anyone wants the Gingerbread recipe emailed to them just email me here or find me on Facebook!


Saturday, November 13, 2010

Meaty Meatballs

We have a very noisy house. I am kind of loud (and overbearing) for the most part, and the kids can't sit at the table and have quiet conversation. There is always lively conversation or a debate over something  (or nothing) going on. 

Somehow, and I am thankful for this, dinner time in our house ends up being so much more than just 'dinner'. It is the place to be on a Friday night. 

Knowing that a few of our friends were coming over for supper, I decided to 'help' the Chef with dinner, because we were having one of my favourite things ever. Spagetti and meatballs.


Earlier this week, Ron had used up the last of our summer Basil plant (we say BAY-zihl; you say BA-zihl)
and made a tomato basil sauce. So the hard part was done. If you have never made your own pasta sauce and insist on buying the sugar loaded ones at the grocery store, then try this easy peasy recipe and you will be hooked. 

Basil Infused Olive Oil
2 cups Olive oil
1 whole bulb of garlic
1 med size onion (chopped)
2 good handfuls of Basil

Throw it all into a pot and cook until the onion and basil are turning brown, but not burnt. 
Remove from the heat and strain in a wire mesh strainer (not a plastic one)

Open five cans of plum tomatoes and dump into a large bowl. (chop the tomatoes if whole)
Add in your infused olive oil and voila. 

Pasta (or pizza) sauce, done! You can store it in the fridge for a week (easily) and we like to freeze little baggies of it for those nights when you just don't feel like cooking!

Next, onto the meatballs.
This is a fairly big recipe that fed 6 adults and four kids last night and we still have some meatballs in the fridge that might be 'Cheesy Meatball Sandwiches' for lunch later today.

1 1/2 pound Ground Beef
1 1/2 pound Ground Pork
1 1/2 pound Ground Turkey
2 cups fresh breadcrumbs (with chopped raw garlic and parsley)
6 eggs
2 cups of milk
1 cup grated parmesan cheese (can be omitted if there are cheese allergies)
Lots of ground pepper
4 tsp of salt

Before you move on, get two large sheet pans greased with some olive oil and turn the oven on high.
Also, get a small frying pan and leave it on the stove top (warming) with a little olive oil.

Now, here is the yucky part. Put it all in a bowl and mix with your bare hands. Raw meat, raw eggs, milk, breadcrumbs...............you have to really love food to get into this part. I hate raw meat and all the raw eggs etc. but this is the best way to truly 'make' these meatballs. You need to mix this up like a bread dough. Making sure it is completely mixed all the way through.

Before you start making the meatballs, take a small amount of the meat/mix and fry it in that small pan you have waiting. As soon as it is cooked, assume because all the kids were eagerly waiting to eat it and did so without worrying that they might burn their mouths that it is perfect the way it is, taste it for seasoning and adjust to suit yourself. 

Now, make into a nice size meatball (not the little ones) and place on the (already prepared) sheet pans. Cook in the oven for twenty minutes or (my personal favourite when I ask the Chef a million time's if there are done yet) 'until they are done'.  

HOW WOULD I KNOW WHEN THEY ARE DONE???

SO, before I get into the PASTA part of the meal, find the largest pot you own and fill it 3/4 of the way with water and put it on to boil. You ALWAYS have to add SALT to the water. The water should taste like the ocean. DO not use low sodium salt here (unless of course your doctor has advised you to stick to a low sodium diet). As a matter of fact, whilst I am on the subject, if you own low-sodium salt, throw it away. It has a terrible taste. Go buy some Maldon Sea Salt (large flakes) and some plain old Saxa table salt. 

OK, where was I. Oh yes, the first thing you need to know is 'I do not like pasta'. The only time I eat pasta is when the resident Chef cooks it. I also HATE cooking pasta, because in this house, if pasta overcooks, then pasta is thrown out, and we have to start all over again. Therefore, I never cook the pasta. If you live in the US, then the pasta you should be buying is La Molissana. Why? Because it is the best. If you live on the other side of the pond where we are, then you should be eating DeCecco. Why? Because it is the best. If you want to make your own pasta from scratch, then do so, but you will get great results from either of the above brands, every time. 

Once the water has come to the boil, dump in two packets of linguine and stir the pasta continuously. Do not stop stirring. Never (ever) break the pasta. That is just wrong, and the Italians never do it. If you have been breaking your pasta all along, because it will not fit in the pot, then go out and buy a bigger pot. The linguine will only take 9 minutes to cook. Get a large strainer set up in your sink and once it is done (taste it - do you like the texture? Al dente is best) strain the pasta and set it aside for a few minutes. NEVER EVER rinse it with water. 


Now, those yummy meatballs are cooked (and hopefully you did not let them burn). In another large pot, pour in your tomato sauce and all your meatballs. Allow to come to the boil then simmer for 45 minutes to 1 hour (or longer if you are waiting for your BFF to arrive with the wine). 

The longer the meatballs simmer, the softer and fluffier and lighter they become. Just make sure you have the pot on a low simmer and do not burn the sauce/meatballs. You will notice a lot of the excess oil floating to the top. Ladle it off and keep it. This is your infused olive oil. You can use it tomorrow for making the same kind of sauce again for lasagne! Waste not want not!


Last but not least, dig out a loaf of stale bread (I know you all have one) and make some garlic butter (several cloves of raw garlic chopped, with chopped raw parsley) whilst you are waiting. Butter the bread throw it in the oven for a few minutes. 

Dump your Linguine back into that pot you cooked it in. Spoon out all the meatballs into a nice large serving bowl, and pour all the sauce over your pasta and mix it nicely. Then place a nice large serving bowl on the table filled with your pasta, and the other bowl with the meatballs. There should be enough to feed a small starving army. Grate some parmesan cheese over the pasta for a final blast of flavour. Again, here, I will have to insist that you only use the real deal - Parmigiano Reggianno. Do not use the schwag. Remember - Garbage in, Garbage out.

Get the kids to set the table, compliment your husband on the fine job he did making dinner, drink every last drop of the yummy wine your BFF brought to share and be everlastingly thankful for cousins and friends that sweep the floor and do the dishes before they all roll out the door, happy to have had such a yummy start to their weekends.

Life is miserable for so many people in the world today. Everyone is worried about the 'state of the economy' and the doom and gloom that the next budget will bring. 

It is so important to reflect on the fact that we are healthy, we have a roof over our heads and we can enjoy a lovely meal on a Friday night with our friends and family. What more can a girl ask for.

Those are all the WiseWords I have for today,

WiseMóna

Sunday, November 07, 2010

All for the love of Cheese....and eggs and pastry and salad and Wine.

Click on the cheese to read the story on 'Free Government Cheese' in Ireland.
There is a rumor going around the island that there will be free cheese for Christmas. This government-giveaway is designed to help the needy get through the hardship of Christmas by offering them a few blocks of cheese. I hate to sound even a trite sarcastic (because I love cheese) but how in the heck is a block of Calvita going to provide sustenance to a family in 'need' at Christmas. 
Click on image to read all about 'Lough Boora Organic Farm' 
Since growing and gardening season is winding down and a lot more time is spent indoors by the fire toasting our toes, the Chef has recently enrolled in a 'box scheme' at work. A nice farmer from Lough Boora Organic Farm drops off a basket every Friday (€20) brimming to the edges with a selection of what ever fruit and veg is in season right now. This week we received some nice big fat leeks, so the begging for one of my favorites 'Quiche Lorraine' began. Keep in mind that my handsome Chef never gives me what I ask for, but usually takes the idea and makes it better. So, I have learned to suffer in silence. It is what you do.


If you are going to attempt this dish (I am posting the recipe below) then either run to the nearest grocery shop and buy the ready made pastry crust OR you can try to whip up the one the Chef threw together, which made a very nice flaky crust. 

WhatchaNeed:

3 cups of flour
4 ounces of LARD (cookeen/crisco)
1/2 cup of water
Pinch of salt.

HoTaMakeIt:

Mix the flour and the lard with your fingertips until it is all nice and lump free. 
Add in the pinch of salt then slowly pour in the water and mix until you form a nice ball of pastry dough. 
Take note, do NOT over work the dough by kneading it over and over again. 
It makes the dough tough. 
Now, put the dough in the fridge for 1/2 an hour to let it chill. This is very important. 
After it has chilled, take it out and roll to your preferred thickness for your (greased) casserole dish. 

This recipe makes a decent amount of pastry so just wrap up the remaining pastry and pop it in the freezer. This way you have no excuse to not be able to make a quick tart/pie when someone comes to visit........

Now for the custardy quiche mixture. This is a family size recipe - feeds a family of four kids and two adults and the occasional extra mouth at the table.

WhatchaNeed:

6 large eggs. (Splurge and get some local organic ones. The yolks are very orange in colour and it will tast better!)
1 1/4 litres of full milk.
12 ounces of grated cheese. (Cheddar/Gruyere works best, but go with what you like.)
2 Leeks, washed and cut into circles. (Keep in mind that there can be a lot of sand in leeks, so wash well)
1 1/2 pounds of bacon cut up into small pieces. (For the Irish: Use smoked Rashers - not a lump of boiling bacon)
Freshly ground black pepper.
* Note  * we are not including salt in this recipe because the bacon is salty enough.

HowTaMakeIt:
First - pre-heat your oven to 220 celsius.
Fry the bacon and freshly ground black pepper and once it is nice and crispy add in the leeks.  Allow them to cook until soft and translucent. Once finished, drain off the fat. You can keep this fat in the fridge for several weeks and use it for cooking. Remember 'Fat is the train upon which flavor rides' ...

Now, with a balloon whisk mix the milk and eggs together in a bowl making a nice custardy mix.
Take your casserole dish with the all-ready-to-go pastry crust and throw in the leeks/bacon mixture, the grated cheese and then pour the custardy mix on top and you are ready to go.

In the heated oven, place the quiche on the middle rack and leave alone for twenty minutes. Then reduce the heat to 150 celsius and leave for another twenty minutes. Shake the casserole dish and if it still jiggles in the middle, it is not done.

BUT, you can turn the oven off and leave it 'still cooking' for another 15 minutes.

It will not burn. Do not keep opening the door of the oven to check. (or so I was told - a few times).
Click here if you would just rather pop over for dinner and get the Chef to make it for you ;0)
If you follow along and adhere to the rules, then you end up with the picture above here. A yummy custardy quiche, served with a simple end-of-summer salad and a fab. bottle of chilled white wine. If you are like me, and cannot follow a recipe to save your life, then either A). Marry a chef or B). Give the recipe to one of your great 'baking' friends and have them make it for you and then invite you over to try it for supper some evening. Either way, it is to die for.

Those are all the WiseWords I have this morning,

WiseMóna

Ratings and Recommendations by outbrain